Thursday 25 June 2015

Frame it Some More- SkateBoarder Teen Card

I hope some of you have joined in the 'Frame It' challenge over at http://polkadoodle.blogspot.com.au/ .
If you haven't yet here is a little bit more inspiration for you. Today I have used a great skater boy image you will find using the link below:
 
 
Copic colours used:
Skin: E30, E51, E53
Hair: E79, E15, E47
Jeans: B91, B93, B95, B97
T Shirt: R05, R46, E47
Skateboard: YG21, YG07, YG17, G05, G46
Wheels: W1, W3, W6
Shoes: W3, W4, W5
 
House Background Paper from Studio Calico 'Here and There' collection.
Ranger Distress Paper in Tea Dye was embossed using Design Objectives Brick Wall embossing folder. Paper was then sanded back using a sanding block.
Stars cut using the Sizzix Bigz Die- Crescent Moon and Stars by Tim Holtz.
Stars were coloured using the Copic colours used for the skateboard.
The red frame, stars and skater all have different thicknesses of double sided foam tape on the back of them to create dimension on the card.
Bling by Provocraft.
All paper pieces were distressed using Walnut Stain distress ink.
 
Thanks for stopping by and leaving a comment.
Jackie
 
I am entering this card into the following challenges:


Thursday 18 June 2015

Frame It- Polkadoodles Challenge Blog

How lucky am I to be able tobe a Guest Design Team member over at http://polkadoodles.co.uk/.
My first piece is for the blog page (http://polkadoodles.co.uk/blog/ ). I used the Oddella Twig digi to create a canvas frame. You can find the image using the link below:
Details for making the frame are given below.
I can hardly wait to see everyone's interpretations of the challenge "Frame It" over at the blog.
What will you be making?


Copic Colours Used for Oddella Twig:
Skin: E51, E53, E93, E04
Dress: YG11, YG61, YG67
Hair: W2, W4, W6, W8
Branch: E37
Scarf and Tights: V20, V22, V25

Paint a frame canvas frame with brown acrylic paint and allow to dry.
On a piece of paper (I used a sheet of old music paper) apply the tree background using Impasto medium and the Crafter's Workshop 'Woods' stencil.
Leave to dry or dry with a heat gun. Don't worry if the Impasto bubbles slightly- this just adds to the texture!!
Spray your paper with Dylusions Inks in 'Cut Grass' and 'Melted Chocolate'. Blot excess colour with a paper towel. Once dry wipe over some gold gilding wax.
Use a double layer of foam tape to add Oddella to the frame.
Colour some gauze using 'Cut Grass' spray and add this to the bottom of the frame.
Using Tim Holtz's on edge die 'Twigs' cut three border pieces from chipboard and colour with Brushed Corduroy Distress Stain. Attach using strong double sided tape and bend the branches to create dimension. 
Cut strips of woodgrain paper to the width of the canvas frame edge. I used October Afternoon's Sasparilla 8x8 pad for my paper. Two of the strips were cut straight to the width of the frame and two strips were then mitred to cover the last two sides and create the look of mitred corners.
All pieces were edged with Brushed Corduroy Distress Ink.
To finish the front of the frame I added a TwiddlyBits black iron gate, mulberry flowers from my stash and some brown bling.
Let me know what you think.
Thanks for stopping by, Jackie.


Monday 1 June 2015

Viva Las Vegas!!

What better way to spend a Monday WA public holiday than doing some crafting. Today I played with some of my stash of Viva Las Vegas stamps.

 
The gorgeous elephant here is a VLV stamp. I coloured it using Copics before adding it to my Journalling inspired card background. The background was created using Dylusions Spray Ink and a Dylusion stencil. I also stamped a lacy VLV stamp as a background in Dusty Concord Distress Ink. Black markers and white gel pen were used to highlight different shapes. Some arrows were hand drawn but the large one was another VLV stamp...this one is well used! Using the Distress Ink, I also went around the edge of my card and used the colour with a waterbrush to create some subtle shadows around the elephant. I am going to enter this card into the 'Use Bright Colours' challenge over at http://www.throughthepurplehazechallenges.blogspot.com.au/

 
This card is for my son for his birthday. The image is a VLV stamp. As it was not really an image to colour, I instead chose to put it on a background with some depth made from smooshed Distress Ink on watercolour paper. I used my Copics to throw in a touch of blue like the handmade paper used for the rest of the card. It is a little hard to see the gauze in the photo but nestled within it are microbeads. The sea die in the corner has been distressed. It is a new Memory Box die.

 
My last piece using a VLV stamp is actually an ATC. I have used distress ink to create the background and then stamped the image over the top. I used a waterbrush and gesso to add highlights as well as using some extra distress ink to add depth. The words on the card are from an old box and the cogs are from another Memory Box die. I simply chopped up the cog background piece after rubbing gilding wax over the whole section.
Thanks for stopping by, Jackie.


My Life Book so far!

I have joined some friends on a Life Book journey this year with willowing.org. Tamara is a talented artist who guides us each month with a tutorial. She has many guest artists and I look forward to seeing what new project is available each Monday. It is a great online course. I have not yet completed all the projects to date but have some of pieces so far to share with you.
 
This was my first one of Tamara's classes 'Beacon of Light' . I am having fun layering paint, stamps and papers. Can't believe I actually drew her face. Super teacher!

 
I have long admired the journaling style in many people's pieces of art. I have a way to go to finding my own arty style for this.

 
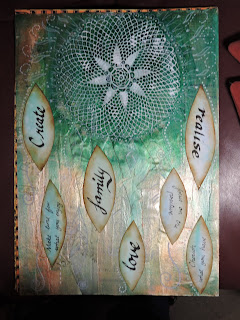
The dreamcatcher was fun to make. Lots of collage and painting. I think I will revisit this piece at a later date to get a bit more depth.

 
This was the hardest class...following a very quick time sped tutorial and then making a similar picture. The collage was fun but the painting a challenge. Enjoying playing with whimsical images.

 
The field study was fun and one day when I have more time I would love to have a book solely for exploring this more. Gumleaves and Gumnuts took over from feathers and shells.

 
This painting was made up of layers and layers of paint. I like this one...perhaps because I love owls so much. It was nice to use some different colours.
 
Lifebook is more than creating artwork...it is about having the confidence to express your thoughts and ideas. I am finding it a wonderful experience. Check it out and maybe have a go yourself at one of Tamara's workshops if you feel you are not ready for a whole year.
Happy making, Jackie x


Stampotique ATC Swaps

Hi everyone, I have had a weekend of catching up on some of my other projects as the Simply Betty Stamps Design Team has unfortunately disbanded. My posts have tended to be purely those images for a while so I thought I would share some of my other arty makes for this year. The first of these are some ATCs that I have made for the last three swaps at Stampotique. For each swap we make two different people an ATC. It is great fun getting a surprise from another part of the world.
 
 
My first swap with the group was on the theme 'Nursery Rhymes' I used Copic markers, Distress Stains, Black Memento Ink and White Gel Pen to them.

 
This swap got everyone thinking. It was called 'Switcheroo'. We had to cut up different stamped images and create a new image using the parts. The first one was my favourite- a mixture of human body and bee body parts. Lucky I found some stripy legs! I stencilled the honeycomb background and added Stickles to the wings.
 
 
This swap was called 'Photo Bomb'. I used foam tape on both of these ATCs to get one image to be in the foreground and make the other appear in the distance.
The swap I have finished this weekend is a Shiny/Metallic swap. I will reveal these when the swap is over. I can hardly wait for my ATCs to arrive from other artists!
If you like the idea of joining these swaps visit the Stampotique Facebook Page and click on Events. I hope some of you join in the fun...the more the merrier!
Thanks for stopping by, Jackie